Cadet has been on my list for a while; we finally got a clear weather window to attempt it.
Approach: We rode bikes into Monte Cristo. (The last time we road to Monte Cristo, we took the mine mitigation road, which is a bit longer, but no river crossing. I read some trip reports from a year ago that there were blowdowns that were a pain to cross. I couldn’t find any updated information on if they had been cleared. Rather than risk blowdowns, we took the main trail/road, which was fine). We walked our bikes across the river section, which is well flagged, and the rest of the road was fine on a mountain bike. It definitely saves time. 4 miles each way. It took us about an hour going in (more uphill) and 35 minutes going out.
Route: I did a lot of research on the route. The trip report that helped the most was: https://www.nwhikers.net/forums/viewtopic.php?t=8000857&highlight=cadet+pk+peak.
Note: there are no longer any ropes on the trail from Monte Cristo to Glacier Basin. This is no big deal. It was a well-trodden trail or easy Class II scrambling on rock slabs the entire way.
Even with this beta and a good gpx track there were a couple of tricky spots:
- Once in Glacier Basin, after you cross the stream (this was the last water source), you will ascend a talus slope on the left (north) side of the basin. There is a deep erosion gully; hike up the right side. It is easier to cross the gully near the top where there is some solid rock to climb up and down.
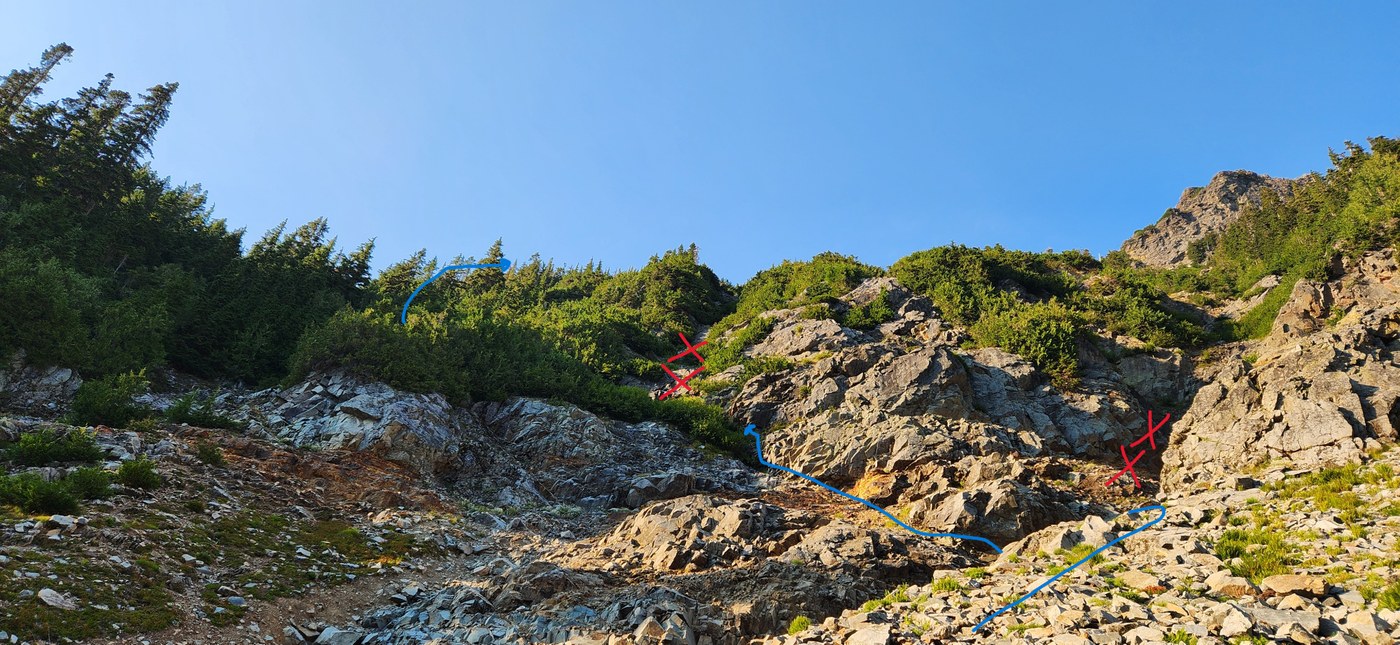
- After you cross the erosion gully do not continue up the first rocky gully to attain the ridge. Cross to the left and you’ll look for a ramp that will take you into the cedar filled gully. This is great because you basically veggie belay the entire way up and there is no danger of rock fall. On the way up we missed this and took the next gully to the left, which was doable and much better than the first gully (avoid this one). On the way down we got the correct cedar-filled gully, I did add some additional flagging that will hopefully help future climbers find the right spot (see notes on my photo).
- Once on the ridge it is easy to follow the trail/route up to the final cliff band. Here is where you must pay attention! So many climbers have gone straight up the first gully that there is a well-defined trail leading you there (we did this and got part way up and realized our error). Don't go straight up!
- Once you see the wide-open scree field at 6500’ cross to the left. There are a few cairns to guide you. The gendarme rock formation in Midlife Hikers trip report was key.
- Cross below that rock formation and then look up for a small ledge (see my photo). It’s a bit exposed, but short. Once around the corner, you are home free and can follow a faint boot path all of the way to the summit.
This peak has a lot of loose scree and steep gullies that are somewhat annoying, but the views from the top make up for the toil to get there. 360 degree views…stunning. We looked for a summit register but couldn’t find one.


Comments